Note: This article has continued to receive updates. For technical reasons, it will continue to say Nov ’18 at the top, but includes software that was released after that date.
So here’s a big comparison of almost all the available commercial RAW converters for Mac, plus six open source ones, plus three commercial Windows-only titles. If you’re a Windows user, you may find a few names on this list that you haven’t heard of before, as they are Mac-exclusive. Criteria for selection were that the software should support Pentax cameras and be usable completely offline I will mark the differences in the table. Surprisingly, all programs seemed to support Pentax cameras as both DNG and PEF. Note: Later additions to this article have not all been thoroughly reviewed yet.

JPEG export settings used
Images shown as part of this review are the default renderings. That’s all I’m going to focus on, for this as well as part 2.
Images were directly exported from the converters to JPEG. When either or both options were given, quality was set to 90 and the colour profile to sRGB. Otherwise, the default settings were accepted. RPP offered nothing between 85% and 95%, so 85% was chosen. Phocus offered a “high” quality setting as well as maximum and some lower settings. The “high” setting seemed to correspond to approximately 90% and was chosen. Perfectly Clear offered no setting, and exported at 93% quality automatically – I have not done extensive testing to confirm whether it is always 93%.
As the focus of this article is on raw conversion, Perfectly Clear was used as a stand-alone, not as a plug-in.
Operating system was macOS High Sierra 10.13.6 for most of the Mac testing.
Problems encountered
All Skylum products (Photolemur, Aurora, Luminar) and ACDSee could not operate without phoning home and did therefore not receive further consideration two three Skylum products now included (but I’m not impressed), see below. Two versions of ACDSee for Mac also included. Similarly, Perfectly Clear could only be installed via a download manager that had to be installed before anything else could be installed.
Update: I got “free” Luminar and Photolemur licenses as part of a bundle and so have added them to the list of tested programs. Having reviewed Luminar after all the others, I can say that in the default rendering, Luminar offers nothing that would lift it above a free offering such as macOS Preview. You may read more positive things about Luminar elsewhere, but be aware that they have an affiliate marketing program and the people who are telling you nice things may directly benefit through providing a sell button. In forums, Luminar has been described as “beta” software, and it’s been alleged that it has long-standing bugs. The recent version “with libraries”, as I’ve reported, was found by many users in several forums to be particularly buggy. Also now added Aurora HDR 2018 as I similarly got a free license via a giveaway.
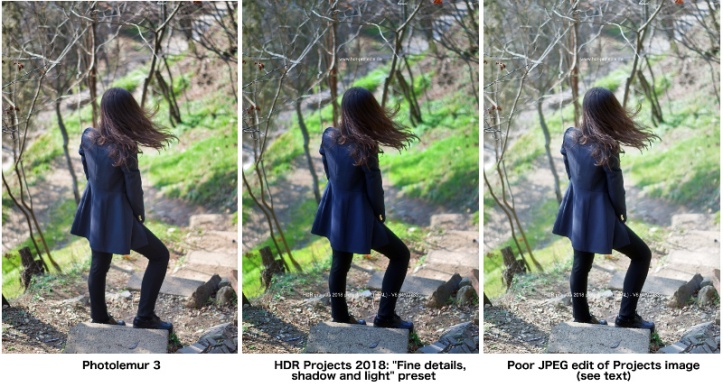
The problems with Photolemur are of a different nature. Photolemur needed a lot of memory and time (several minutes) to produce a rendering that was pretty similar to something HDR Projects can produce instantly with two clicks to select the correct pre-viewable preset (see below). Worse, it needed yet more time (again, minutes, roughly as long as the first step) to save the image, almost like it was re-rendering the entire image yet again rather than making use of the image rendered in the first step. The phoning home of these two apps is a price not worth paying, not to mention the software also costs money on top of that.
RPP unexpectedly crashed the first time the Pentax DNG was opened. Even worse, Photo Ninja just “booped” at me when trying to click anywhere within the window and displayed a tiny preview of the image. On the second launch it seemed to work fine, but would not export, so a screenshot is provided instead. The memory consumption in the case of PhotoNinja therefore refers to simply loading the image into the application – it was already fairly high, but did not seem to have memory leaking. RAW Power 2.0 froze at 100% CPU usage (one core), unable to complete the export (I tried several times). Presumably, exporting at a smaller size and placing an ugly watermark is just too much work.
Cyberlink failed to quit on Cmd+Q, and had to be quit through the menu instead (i.e. you need to mouse your way up there – depending on how you work, this may not be a problem). Also, you can only enter parameters into fields in Cyberlink while hovering your mouse over them – mouse away and your chance is gone. Reading what you’ve entered while the mouse is over it… well, you get the idea.
DxO needed to phone home to get optics modules and thus was used without the usual corrections. It also did not make PRIME denoising available, so this could not be tested.
DxO, RAW Power, HDR Projects, Color Projects and Iridient watermarked the image, but HDR Projects, Color Projects and Iridient were more subtle about it than the other two.
Corel Aftershot needed manually downloading and installing a camera profile before it would open any DNG files – this needs to be done for each camera, one file at a time, apparently. The camera profile was a meagre 15kB in size, so why this can’t just be installed by default is hard to understand.
Color Projects output an image rotated by 90 degrees counterclockwise although it correctly displayed it in the application. Its default preset was “natural high quality”, which is more saturated than “natural neutral”, and was in fact the output with the most saturated greens except for HDR Projects. HDR Projects also rotated the image by 90 degrees counterclockwise on export. Please note that I manually corrected these rotations, so you should imagine yourselves having to do the same, presumably every time you export a portrait orientation image!
Luminance HDR did not select a rendering, but instead displayed a flat picture profile. In this case, I therefore took the liberty to select a rendering that looked reasonable – it should be noted that Luminance HDR’s 11 algorithms vary hugely in how the output looks, covering everything from muted to garish.
Silkypix did not register itself as being able to handle any raw files (including DNG), so images could not be simply opened from the Finder.
On its first attempt, Capture One exported an image of 16168775 pixels instead of the expected 19961856, but exported a full size image on the second attempt. Hasselblad Phocus exported its first image correctly and then froze. Phocus generally froze a lot for me. This was also my experience the previous time I tested it. Its output is identical to that of Preview as it uses the macOS RAW engine. However, it has many more customisation options than the OS’ own tool. The image produced by Aperture is very slightly different – again, more options available.
Similarly, the output of Silkypix DSP 7 and 9 was identical in spite of claims that oversharpening of out of focus areas had been addressed. Out of focus areas in DSP 7 did not seem oversharpened compared to competitors, so perhaps the sample image was not affected by this bug, and further investigation is needed. Still, having two images that are identical pixel by pixel seems remarkable.
RAW Power seemed to be leaking memory in chunks of approximately 70MB up to a maximum of 600MB.
Silkypix, Photivo, Color Projects, HDR Projects, Cyberlink and Aperture would not associate with files, while some programs including Lightzone and Picktorial seemed to make themselves the default app without asking. I did not pay attention until after this latter phenomenon happened, so this might deserve another separate investigation, and there might be more culprits found.
With that caveat, only RPP, On1 Photo RAW, AlienSkin Exposure, RAW Therapee and Darktable seemed to perform without hitch. However, RPP, RAW Therapee, Darktable and Photivo were also among the programs where figuring out how to correctly export, or in some cases export at all, took some digging. So only On1 Photo RAW and AlienSkin Exposure really performed flawlessly from a usability view.
PhotoWorks, on the “auto improve” setting, gave an incorrect output rotation of the image. On the standard setting, the output rotation was correct.
Positive things encountered
Several applications, among them DxO, Lightzone, AlienSkin, RPP and HDR Projects, label their exports with a suffix – _DxO, _lzn, -Exposure, _rpp and _HDR, respectively. This is useful because it means that even if they export to the same folder, they won’t overwrite each other’s files.
The two HDR solutions only seemed to support sRGB as a colour profile; however, they additionally both support special HDR image formats whose colour gamuts I’m not familiar with.
I did not notice any program not supporting 16 bit TIFF output, but I may still double-check that.
Data gathered (click for a larger view)


Generated images
Thumbnail gallery (click for a larger view)


Full size images (click for full size)


Concluding words
(This got longer than I thought it would be, but if you read it carefully, you’ll find out how to get a pretty good DAM and RAW converter completely for free.)
As a tool for your self-expression, picking a RAW converter is a highly personal thing, which is why I have no strong desire to make any particular recommendation at this point. I’ll say a few obvious things that stood out to me. HDR Projects produced the most saturated image, followed by Color Projects. Luminance HDR was surprisingly muted in comparison, but has the benefit that I picked an algorithm, Drago, that looked reasonable with default settings. I suspect some of its included algorithms are better for exposure series, which I did not test as part of this review. HDR Projects also comes with a range of different presets, about 130 in the “Professional” version and 105 in the unnamed edition – the standard edition for lack of a manufacturer’s commitment to a name (for marketing reasons, I believe).
Photo Ninja at its current price of $129 and having seemingly not advanced in the years since its release, is not worth any recommendation, and I found myself wondering whether they should have stuck with developing Noise Ninja as a solo product, but then I don’t know how much that was selling for. Perhaps I’ll do a test of Photo Ninja as a noise reducer, but with it offering no export option in the trial version, it will be quite tedious. A trial version that doesn’t allow export feels like a product designed to frustrate well-meaning reviewers, and the two-week “trial” is nothing to brag about in any respect – 30 days is the industry standard.
AfterShot looks extremely capable by comparison and has earned recommendations based on price and performance from at least one magazine. Silkypix 7 has recently been making the rounds for $49, and if you like images a little saturated, is an excellent demosaicker – don’t expect much more from it, but it the rendering seems to be the recently released version 9, so you’re getting good value there, too.
Affinity Photo was the program with the shortest trial, and produces a very bright image. I did not have time to re-evaluate whether this is done with a view to an “expose to the right” (ETTR) editing strategy, i.e. to preserve colour accuracy, especially in the shadows. That would be mostly true if its default editing is in 8 bits, which would be a little anachronistic if true, but Affinity Photo has been accused of employing some poorly ageing algorithms in its processing, so it’s possible and would need further investigation. Aside from Affinity and various other ones that had short trial periods, the other majorly annoying one was DxO with its huge watermark.
On1 Photo RAW impressed me as being extremely serious and professional for a newcomer. After hearing initial reports of instability about early paid releases, I did not expect this, and it’s a very welcome addition to the ranks. In this case, having the 2019 output be the same as the 2018 one may be a good one. If there isn’t a bug like the oversharpening that can happen in some versions of Silkypix, keeping the default rendering consistent is probably good for the customer. At $99, On1 Photo RAW is now somewhat normally priced, though, although cheaper than AlienSkin, which it seems to be closely competing with in terms of providing good import from Lightroom if that’s what people were using in the past. The benefit of migrating a keyworded library cannot be understated – for many photographers, this means retaining hours or days of labour already spent and not having to redo the whole process.

RAW Power, having been billed as an Aperture replacement because one of the developers is the same, surprised me as being relatively light on features. If you can look past the giant watermark in the trial version, you may notice it has the same default output as macOS Preview or Hasselblad Phocus, and the Aperture output is only very slightly different (Aperture still works with High Sierra, for instance). If you’re just looking for a demosaicker, go for macOS Preview. Its price of $0 is unbeatable, and it’s already built-in, so unlike RawTherapee or darktable that I do have a big soft spot for, it does not require installation, and it exports 16-bit TIFF if you need that for further editing. Having said that, if you want ProPhotoRGB for a bigger colour space when editing, RAW Power is your 20 Dollar fix, while AlienSkin Exposure, Corel Aftershot Pro, Cyberlink PhotoDirector, Iridient Developer, and On1 Photo RAW would be options for doing that at a higher price point and with more features generally.
Cyberlink is not being taken very seriously by photographers right now – perhaps rightly so as it has at least a few quirks and some very odd marketing. And it did slip on a few images in testing (example below) but seems to provide good output for some cameras, so my earlier “buyers beware” rating still stands – test before you buy! Among the RAW converters that present themselves as full-featured, it is one of the more affordable options.


Capture One is at the opposite end of the spectrum, and does everything you’d expect, and at a very high price, at least double of pretty much anything else on the market. Most of the time, it produces very good output with good performance, though.
LightZone was the program that based on the sample output did not, to me, reveal its raison d’etre. I understand it has sort of a cult following, and gleaned that it is mostly used for black and white conversion – as alternatives to sRGB output, it offers some unusual options such as Sepia.
As for the sample image output, I found that I generally liked renderings that brought out the blue in the coat a little bit. This was clearly the case for HDR Projects, LuminanceHDR (not all algorithms), Color Projects, Capture One, DxO, and AfterShot. It was mostly absent in LightZone, PhotoNinja, Photivo, and RPP. The others had it in varying degrees of subtlety, and of course it would be less noticeable if the general exposure in development is also lower (true of RPP) or depending on the saturation of surrounding colours.
What I haven’t elaborated on here, and what you might want to take into consideration, is whether you want or need a Digital Asset Management solution built into your application – that is, a library of your images that offers features such as applying and sorting by ratings, assigning and searching by keywords, and having a dedicated space that shows just your (RAW) images and all of your (RAW) images. (Although that latter part can to some extent be solved using the built-in Virtual Folder in macOS.) If you’re looking for a free DAM that can be added to probably just about any RAW converter or simpler demosaicker, darktable gives you that option.
So for those specifically looking for a recommendation, I’m tempted to say set up a Linux machine and test out all the wonderful free options there, and if you still want something commercial, grab the Linux version of Corel AfterShot Pro – affordable, feature-rich and very solid so long as you remember to import the camera modules you may need. You weren’t expecting that, were you? Are you glad you read to the end, though?
Need more info? Look at part 2: rendering of fine detail.

big job !!!!!!
Indeed it is – thank you for taking the time to comment!